The Floorpan and Rocker Situation

March 26th, 2010 Comments off

So, you may remember that I had the floorpans and rockers done.  Well, I’m going to have to have them redone.  Are they in?  Absolutely.  Are they “daily driver quality or at the very least installed correctly so the rust will not come back”?.  Unfortunately no.  I didn’t think – nor did I WANT – a show quality level job done.  I just wanted it to be presentable, functional and NOT have bits welded over rusty bits.  But no such luck.

I’ve been stewing about this for a while because I really liked the guy – he was a really nice guy.  And he said up front “this will be daily driver level quality”.  And that would have been fine.  But come on – I mean take these things into consideration:

  1. The doors scrape the rockers.  Granted the doors are not in fantastic shape – but they didn’t hit the OLD rockers.  The replacements should be no different.
  2. There is body filler just slapped over rust.  I know this because I have eyeballs and when you scrape off body filler you find old paint and rust underneath.
  3. Welding new panels over old rusted ones.  I mean, I didn’t expect him to sand blast it.  But I did expect him to hit it with a DA sander or something.  Where the panels overlap you can look up inside and see the old rusty panel.
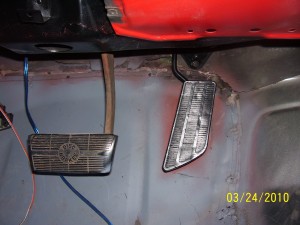
  4. The floor pans are high enough to prohibit the gas pedal from going down more than about a 1/4″.  I fixed this by bending the pedal arm, but what a kludge.
  5. None of the trim fits now.  I would have to cut about an inch off the bottom of the trim to make it fit.  No thanks.

Anyway.  I wasn’t expecting him to stitch butt-weld it or anything.  Just to flange it and spot weld it so stuff lines up right.

I’m now on the prowl for someone to fix it.

Categories: Uncategorized Tags:

Gas Pedal

March 24th, 2010 Comments off

I’m noticing that fixing little annoyances seems WAY more rewarding than fixing huge issues.  On thing that has been bugging the crap out of me is the gas pedal.  It was really… odd.  Not stiff, per-say, but just “unrefined”.  It sort of felt like stepping on a piece of scrap wood that happened to be lying on top of other scrap wood.  Kind of floppy and loose.  And it pretty much had two indexes: “no gas” and “floored”.  Also, it was looking pretty tired.

I the pedal bracket and disconnected the accelerator cable.  After pulling it out, I noticed that a big part of the problem is that the spring on the backside of the pedal was snapped.   Also, when I had the floor pans done (which I will be having RE done – more on that later) the new pan is waaay higher than the old one.  So the pedal was bottoming out.

So I went to O’Reily’s (I love O’Reily’s) and tried to pick up an accelerator cable and some springs, but they didn’t have either in stock.  I was going to just put it off, but then I decided that I just couldn’t wait and went to a different parts store.  They didn’t have the pedal spring, so I just grabbed an assortment of throttle control springs.

I wire wheeled and cleaned all the medal bits and washed the rubber pad, then gave the metal a fresh coat of paint.  I modified one of the large throttle return springs to act as a replacement for the pedal spring.  I had to bend the pedal shaft a bit to give myself more floorpan clearance.  I then installed some new throttle return springs and the new accelerator cable and put everything back together.  And WOW there is a huge difference.  Feels like a normal gas pedal now!

100_1152

Categories: Uncategorized Tags:

Long Story Short…

March 24th, 2010 Comments off

So I took the ION into a local shop to get the “clunk” that it makes when it goes over bumps at slow speed checked out.  All my research pointed to it being caused by a worn lower control arm bushing.

But, not knowing how best to check to see if mine was bad, I took it in.  I told them I thought it was the lower control arm bushing.  they said “No, it is your strut plates.”  Crap.  So I had them change those out and while they were at it I told them to put in new struts.

$800 later, it still clunks.  So I threw it on the jack stands and did some poking around.

I’m no suspension expert – but I’m pretty sure this isn’t supposed to happen…

embedded by Embedded Video

Categories: Uncategorized Tags:

The Big ToDo

March 17th, 2010 Comments off

I’ve decided I need a huge todo list.  This is mainly so I can actually see the list of things getting smaller.  I’ve decided to use a little WP plugin for this, as keeping lists by hand is so 20th century.

[post_todo]

Categories: Project Log Tags:

More Thought on Gauges – and SHOCKS!

March 14th, 2010 Comments off

So I really want to go more in depth on the gauge work that I did – because it was a LOT of work, and I really like how it turned out.  So I want to be sure and document it.

The basic issue was that in my original cluster I had a speedo, a fuel gauge, a clock (that didn’t work), a temp (that didn’t work) a voltmeter and an oil pressure (that – you guessed it -didn’t work).  But that isn’t what I WANTED!  And also, they looked old and nasty.  So I thought to myself, “Well, how hard could it be to just modify the gauges from the cluster to replace the non working ones, and to move the fuel gauge to the smaller location?  And while I’m at it migrate a tach into the slot where the fuel gauge USED to be?  And design new faces for all the gauges too!”.  The answer is very very very hard.

I created new gauge faces by taking LOTS of measurements, and plugging everything into Illustrator and designing a whole new matching set of gauge faces.  I printed them out on photo paper and used a craft knife to carefully cut them out.   When each gauge face was prepped properly, I used double sided adhesive to stick them in place.  As I’ve mentioned before I will probably have to go back and replace them with vinyl printouts because the paper curls in high humidity.

I first had to chop the cluster housing all to bits.  Then cut up the original gauges.  First I cut out the old parts to the clock and threw them out.  Then I took the fuel gauge internals and cut them off the large face they were on, and moved them behind the old clock face and epoxied them in place.  That took about 5 hours because it involved a lot of tiny-part-fabrication and lining things up over and over and over.  On top of that, I had to create and entirely new needle for the fuel gague – the old one was way too big, and the needle from the old clock wasn’t the right size or shape at all.  So I made a new needle out of lexan and painted it to match (it came out really well too – you can’t even tell)  I was able to test the fuel gauge out and position the new needle correctly by using a 9volt battery and a 90 ohm resistor.  The three poles on the back of the fuel gauge are a positive, a negative and a signal line.  If you place a 90 ohm resistor in the right place, and then test it with the circuit completely open, you are basically simulating the sender unit. So you can go “Ok – it should read FULL now” and then position the needle accordingly.

I then moved on to the oil and temp gauges.  I ripped them out of a sunpro gauge cluster.  I cut out the old internals for the original gauges and mounted the sunpro internals behind the faces taking care to line everything up right.  This was a royal pain in the arse, but when it was all said and done everything lined up well.  I placed in their new faces and tested them out and positioned the needles.  To calibrate the oil pressure gauge I created a small pressure chamber out of a section of PVC pipe with a schrader valve and a port to screw in the oil pressure lead.  I also added an additional PSI gauge into the chamber.  I then used a hand pump to pump the chamber to given pressures (20, 40 , 60, 80) and made sure the needle on the new frankengauge matched the ones on the hand pump and the additional pressure meter.  Amazingly, I got it on the first try.  They all pretty much matched up.  To calibrate the temp gauge, I brought some water on the stove up to various temperatures and put in the temp probe.  Needle placement was pretty easy!

Then I cut up the sunpro tach and mounted it in behind the old fuel faceplate.  That required a looot of plastic surgery, but it turned out well.

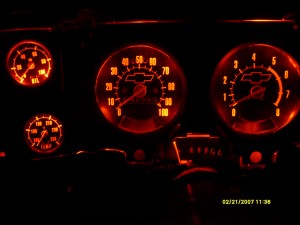
I wanted new lighting too, so I created a network of red LEDs on the interior of the gauge shroud.  It took a lot of trial and error to get everything to fit back together with the added bulk.  I then did some major wiring to the back circuit to get everyone routed to their new homes.  I then installed the new cluster and routed the new temp line and oil line to the engine.

ALMOST everything worked.  The tach didn’t work at first because the ground had been cut by the guy who did the floor pans.  After hooking it back up though, it was fine.  The LEDs didn’t work because the sot I wired them into had some sort of issue – so I had to rewire them to a different bulb feed.  The fuel gauge jumped around because it had a short.  But ofter sorting those things out, everything seems rockin now!  Plus the lights look really nice.

So yeah.  Lot of work but really really worth it.

The other thing I’ve gotten done recently is new shock absorbers.  The truck was really bouncy.  So much so that it felt unsafe.  So my buddy James came over and we tackled putting in a new set of shock absorbers.  Took about 6 hours for all four – but most of that was trips back to O’Reilly’s for sockets and wrenches.  I ended up having to buy a new socket and 2 new wrenches AND a new set of extensions.  I swear every single bolt had a different sized head.  I put Monroes in the front, and would have put them in the back too – but O’Reilly’s only had the one set in stock.  So I had to go with the cheapos in the rear.  I may change those out again before too much longer while all the hardware is still fresh.

Lemme tell you – new shock absorbers make all the difference in the world.  The ride is totally different.  I was shocked (hah!).  Much easier handling – and it feels more real somehow.  Much more like a vehicle and less like a deathwagon.  I can seriously see after I get the interior done and finishing out the suspension and steering gear box wanting to drive it every day.  Ok, and replacing the windshield.  And mirrors.  And weatherstripping….
Categories: Uncategorized Tags:

Gauges in!

March 9th, 2010 Comments off

I’ve actually gotten a lot more done than my posting frequency would indicate.  Winter really took the wind out of my sails: every time I would get the motivation to get back to work I’d realize that it was too cold for paint to set, or that I hit another “I need an air compressor for that” moment.

But some progress was made.  Mainly, I got the gauge cluster done.  That turned out to be a huge project, but rewarding one.  The gauge migrations worked fine – the fuel gauge is in it’s new smaller home, and the new tach looks SICK.  I really like it.  I’m not sure its accurate – but it moves!  The illumination looks almost how I wanted it, but it is close enough.  It’s certainly red.  Looks orange in the pictures – but that’s just the camera.  With the bezel on it looks even better.  I ended up just using my paper mockups instead of going vinyl – but I think that will prove to be a bad move, as they are already curling a bit.  Meh.  I can always fix that later – the hard part was the stupid LED lighting.

I had to do major surgery on the two cluster bezels I had.  One had the correct ac vents, but was in bad shape otherwise.  So I frankenstiened them together.  Still have a bit more fiberglass and filler work to do on that, then paint.  But I will now have the correct AC vents and a proper cutout for the stereo.

Next on the agenda is finishing up the bezel details, wiring in a shutoff for the STUPID POSIVENT system (which I despise) and then glassing the dash.  That one is going to be a full weekend project, but TOTALLY worth it.  I have some stuff I need to pay off before I spend anymore on the truck, so we’ll see how it goes.

I also finally got a new ride!  I picked up a 2007 Saturn ION for a very good price.  I loooooooooooove this car.  It is weird, because other than the truck I’ve never had an American vehicle.  And now I own two GMs!  Honestly, the build quality of the ION is right up there with my 1999 Corolla (my previous daily driver).  For the record – I LOVED my Corolla.  215,000 miles – and I had to take it to the shop ONE time.  But it was time to move on.  So I moved on to a silver ION!

Oh! I also did some sweet work on the grill that I will have to take a pic of.

S7302518

Categories: Project Log Tags:

Gauge Cluster Work

January 17th, 2010 Comments off

I’m posting some pics of my new floor pans.  It is really nice not fearing my feet falling through the floor 🙂

I had originally wanted to finish the floor of the interior with bedliner and leave it at that.  But my first winter with the truck has convinced me otherwise.  Also, I don’t think it would look quite right with the replacement floor pans.  So my new plan is to fill the few holes that are left (just small holes in the caulk where the floor pans were replaced) to make sure no water gets in, then spray in the bedliner, then put in a die-cut heat and noise reduction pad and then a carpet kit.  The carpet and noise reduction kit will be a little over $200 from LMC, which is a bargain if you ask me.

Gauge work is coming along.  My master plan with the gauges has ballooned a bit, but it is certainly doable.  And a pretty good focus for cold-weather projects.  Currently, the gauges work as follows:  there are four ~ 2″ (nonworking) gauges on the left.  Those were clock, temp, volts, and oil pressure.  In fairness, the voltmeter works still.  but it is the only one.  On the right are two ~5″ gauges.  They are the speedo and fuel.  (You know what is ridiculous?  A 5″ fuel gauge.  Waste of space.)

The truck came with some aftermarket gauges as well mounted to the dash.  A 2″ tach and a gauge cluster of mechanical oil pressure, temp, and volts.   This cluster type also came in arrangements where the fuel was in one of the small gauge slots.  So I figured “Hey, GM probably used the same gauge for them both with just a different face, right?”  So the plan was: migrate the fuel gauge from the large slot into the small one, then migrate the aftermarket tach innards behind the face where the fuel used to be and migrate the aftermarket gauge cluster innards into the small slots.  Then I’ll design new gauge faces and have them printed on adhesive backed vinyl by PostNet.  And of course replace all the lighting with LED lighting while I’m in there.

Well, that is a lot of work, so I’m not done yet.  So far I have moved the fuel behind the face where the clock used to be.  I’ve also designed some new faces in Illustrator (printing out mockups on transparency paper to test them out and line things up just right).  I haven’t really tested out the fuel gauge yet.  I’ll have to rewire it into its new location and mess around with the needle to get it pointed right.  (That, or I’ll break it trying)

I won’t really be able to use the original aftermarket cluster as it turns out, because the needles sweep in the wrong direction.  But SunPro makes another similar set that will work too.  They’re just $25.

I’m going to start illumination experiments tomorrow.  I’ll be wiring in a whole new set of LED illumination.

I noticed something funny when I was testing out all the traces on the back of the cluster (in case I accidentally screw something up).  Now I preface this with “I am not an electrical engineer, and I’m not used to working on circuits that have incandescent bulbs in them.”  I was doing some tests on the pins in the pigtail that goes into the cluster when I noticed that all but two of the pins had continuity with the chassis.  This was weird to me – because I knew for a fact that two of the pins went to the high-beam indicator light.  That meant both pins were grounded out somehow!  After checking with my bud Dan and posting on the forums, I discovered that the signal was backtracking through other bulbs and systems in the truck (they’re bulbs – not diodes!  Duh…).  So mystery solved – but it made for some confused moments from yours truly.

Categories: Project Log Tags:

Dash Crystal Repair

January 6th, 2010 Comments off

The truck is back home!  New floor pans and rockers have been welded in place – so my foot is no longer in danger of going through the floor.  And that is nice.  It makes me realize how much work I have to on the doors.  They are pretty beat up – and one of them is gnarly enough along the bottom that it is in danger of doing some rubbing on the rocker.  In fact some of the new primer is already warn off.  New door shells may be in my future.

But now that I have it back, I want to get cracking.  I’m tackling instrument panel stuff because I can do some of that indoors – and it is wicked cold right now.  I’ve decided I’m just going to muscle the instruments I want into place.  But before I do that, I have to do something about this nasty crystal – it is mostly scratches.  I tried to polish it out – but it is actually old enough that the plastic has started to yellow.

First problem – a vast majority of the tabs on it are broken off, which is pretty common on these trucks.  I looked around, but it looks like most people are just replacing them.  I don’t particularly want to spend any dough on it.  And I already have some thin Lexan.  and some brass sheet.

Each tab has a hole for a mounting screw in it.  The failure usually results in part of the plastic surrounding the hole to break away, leaving a partial hole which is pretty useless.  But it is enough to act as an anchor point!  So I cut out some appropriately shaped brass reinforcements, carved out some Lexan bits to make up for the missing plastic that had long ago fallen away, scuffed up all the bits with sand paper for better adhesion, and put it all together with 2ton epoxy.    The finished product is remarkably strong.  Certainly stronger than the original plastic.

Next up:  replacing the old nasty bits of foggy plastic with new crystal clear Lexan!

Categories: Project Log Tags:

Merry Christmas!

December 26th, 2009 Comments off

Wow!  I made out like a BANDIT this Christmas.  I got awesome handmade socks from the missus, AND lots of truck parts.

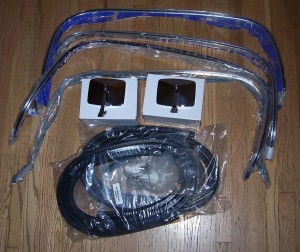
Looks like my wish list paid off!  Many thanks to all those who participated!  I scored a set of cab-side weather striping for my doors, a set of chrome repro mirrors (Love the look of those – can’t wait to get them on!), all 4 wheel arch trims AND new vent window knobs!  I’m stoked.

I did however also dent the bimmer in a miscalculated attempt to get her out of some mud.  But it wasn’t TOO bad, and I’m taking it to the wife’s BMW guys asap.  I am of course very very upset about it.  But hopefully it will be right as rain before too much longer.

Here is a pic of the swag! :

christmas

Categories: Uncategorized Tags:

Homer’s Body Shop

December 17th, 2009 Comments off

Homer’s is where I’m getting the welding done.  Mike there has been working on the panel replacement, and took some pictures.  I’m going to post them up here.

Also, we chatted about future paint options – he gave a very reasonable price!  I just have to decide what the hell I’m going to do for sure.  Cause I REALLY want to learn to paint, but…  I’m just not sure I’d ever actually get around to it.  At any rate…

Looks like it is coming along nicely!

EDIT 2014 Update:
This turned out not to be such a good move. It was a disaster. This is not a case of “oh the customer is picky” – The inner rocker literally fell off in my hand. It wasn’t even tacked on, it was just stuck up with seam caulk. Cosmetically, I wasn’t too concerned since it will be under carpet, but it was an absolute crap job structurally too. Live and learn. It will have to be redone someday.

Categories: Project Log Tags: