Archive

Author Archive

Ok, so a bit more than 30 days…

January 30th, 2013 Comments off

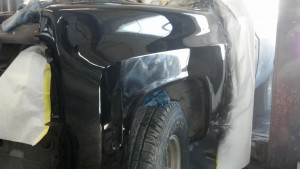
Yeah yeah yeah… I know.  I had said back at the beginning of august that pretty much everything would be done in 30 days.  But events transpired against that and things are a bit behind.    Bo’s schedule got pretty packed and he hans’t been able to get as far as he had hoped: but progress is begin made!  All the metal work has been done and it has been stripped, primed and blocked.  The doors are done, but not mounted or shot with a final coat.  The driver side fender has been shot and I have a pic of that (attached).  Looks fantastic!  The little spots of dust aren’t in the paint I’m pretty sure: I think that is from after it cured.  And if not, nothing a little wet sanding can’t cure.

The painter has done an outstanding job and he has worked hard to fit my truck in his schedule (which is crazy busy), and that means a lot.  After he is done with the paint, I will be tackling the interior stuff myself since it is just piddly stuff like carpet and whatnot.

Unfortunately, while it has been sitting there at the shop the transmission has decided to pee out all it’s fluid.  Time for that thing to go.  My buddy John has offered to volunteer himself and his dad (a seasoned mechanic and drag racer) to helping me build out a new engine.

Plans now stand like this:

  1. Get the truck back from paint
  2. Carpet, paint and trim in the interior.
  3. Drop and recondition the gas tank.
  4. Pull the engine and accessories and clean and paint the engine bay.
  5. Put in the new transmission.
  6. Engine

We’ll see how it goes!

fender-painted


Categories: Project Log Tags:

30 Days

August 6th, 2012 Comments off

This is going to be an interesting 30 days.  I had been putting off sending the truck to paint because things have just been too busy for me to finish up the last things I needed to on the truck.  I did succeed in having the front end rebuilt using poly bushings, so it is less “boat like” now.  I also had a new tranny pan put in, the carb rebuilt, and some other misc stuff.  In the process I’ve learned that my transmission has some serious wear going on in it (the pan looked like I was smuggling gold dust) and that I really want new engine.  Also, I need to address the suspension.  But it runs fairly well now!

This whole time, Bo has been patiently waiting for me to get my shit together (thanks Bo!).  But as luck would have it, Bo has gotten a new project he wants to invest in and so is willing to take on the whole project for a very sweet deal.  He is going to complete ALL the remaining interior and body work for me.

He says he and his team can get it done in 30 days, which would be unbelievable.  I’m going to bring him the truck this week!

This is what will have to be completed:

Interior:

  • Interior steering column painted
  • Foglight wires (from new bumper) hooked to the existing switch next to the steering column
  • AC vents and conduit installed
  • Dash installed (with new custom aluminum defrost vents)
  • Cluster cover installed
  • Wires run placed so they’ll be under carpet (one set of power and two stereo) for future stereo install
  • Heat shield installed
  • Sound deadener installed
  • Carpet installed
  • Door cards installed (on new doors)
  • New window crank handles installed  (already purchased)
  • Plastic interior cab trig installed (this will be a bitch and require trimming probably because of the new carpet and crappy rocker job
  • New chrome step trim installed (also going to be a bitch)


Exterior:

  • All metal work and body work done
  • Paint
  • New doors installed CORRECTLY SO THEY CLOSE RIGHT
  • Install all new seals and rubber in doors  (already purchased)
  • Install new door handles  (already purchased)
  • Install new door mirrors  (already purchased and installed on current doors)
  • Install new Silverado badges (already purchased and painted)
  • Install new cab trim (already purchased)
  • Install new bumpers with and hook up foglights from front bumper
  • Install grill
  • Install new wheel arch trim
  • Install hitch (not purchased)
  • Install diamond plate bed edge protectors (not purchased)
  • Cab mounts (already purchased)
  • Put in driver side fender (already purchased)
Categories: Project Log Tags:

Firewall Leak

February 8th, 2012 Comments off

In prepping everything for carpet and interior paint, I discovered that I had a pretty nasty firewall leak.  The evaporator housing for the (non-existent) A/C is a two part box that is sealed against the firewall.  The seal connecting those two box sides had leaks in it, as did the seal between the box and the firewall.  Also, there were no grommets around the heater core hoses, which probably wasn’t helping.  Anyway, this is a HUGE pain because I now have to completely remove the evaporator housing which requires taking the inner fender off.  I have to remove a thick layer of some kind of gunk a PO used to from the box AND from the firewall.  I’m taking this opportunity to remove the evaporator and dry from the box, plug up all the holes, and paint it to try to clean things in the engine compartment up a bit.  I’m also going to install the new inner fender while I’m at it.  Oh, and also repair the battery tray which has some corrosion left over from the “boiling battery” incident.  I’ll be covering the battery tray in an epoxy to help prevent further corrosion in the future.


UPDATE:

I executed the stated plans.  Honestly, the worst part was getting that goo off.  I took two cans of brake cleaner.  Looks much better now!  Also: no leaks!  3m Strip Caulk FTW.

Categories: Project Log Tags:

Interior Updates

February 3rd, 2012 Comments off

Been busy!  I’ve been pushing hard to get a lot of the little stuff done so that this thing can go to paint as soon as I get to the new place (we’re getting a new house).   There I will have more garage space to disassemble it for prep.  Anyways, short list of what has been accomplished recently:

  • Had new vinyl gauge faces printed and applied them
  • Completed new LED gauge lighting
  • Added LED courtesy lighting
  • Installed LMC clear dome crystal and LED bulb
  • Shot the corner speaker boxes I got from http://www.73-87.com/ with bed liner
  • Added acoustic mat on the rear wall of the cab
  • Painted break booster and lines
  • Installed a new master cylinder
  • Installed a new chrome alternator bracket
  • Installed the new steering wheel
  • Stripped the old paint off the door panels and sprayed on bed liner (to go with the new armrests I got!)
  • Installed new inner window seal on the door panels
  • Started adding the lighting in the wiper panel and temp controls
In the process of all this though, I discovered a leak around the AC/Heater box on the firewall.  So next order of business is getting that cleaned up and resealed.
embedded by Embedded Video

Categories: Project Log Tags:

LMC Awesomeness

January 20th, 2012 Comments off

Since I started this project, I’ve spent more than a few bucks at the Long Motor Corporation.  LMC sells just about everything you can imagine for ’73-’87 trucks.  The use lots of exploded views in their catalog too, so if you find your self with a bunch of random parts and no memory of how those parts went together it can be a super handy resource (assuming you don’t have a shop manual – and a lot of times the LMC views are better in my opinion).

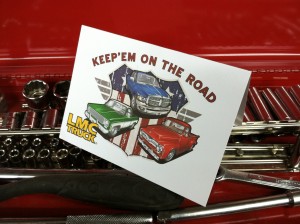
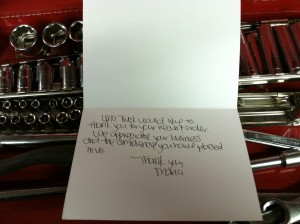
Ever since my renewed push a few weeks ago to get this project completed, I’ve put in a lot of orders with them for the various parts I needed.  That included new bumpers, carpet and sound deadening, paint, door trim, seat belts, cab mounts and various other items.  Basically, everything that I have been putting off buying for the last few years.   Apparently, I made them pretty happy because they sent me a hand written thank you card.

I think I’ve crossed the line of no return.

(EDIT: Ok, I just received ANOTHER hand written note that looks exactly the same.  So probably anything over a couple hundred dollars gets ya one.  Still, it’s pretty cool!)

Categories: Project Log Tags:

It’s Coming Like a Storm…

January 18th, 2012 Comments off

So let me give you the skinny in the 15 minutes I have before lunch:

I had sort of given up on the truck.  After the whole thing with the floorpans, I was really bummed.  I felt like it was the death toll on any hopes of ever having decent bodywork done.  Plus I had come to the estimation that to have a decent paint job, I was going to be looking at about $6k.  Add to that the fact that it seemed like no matter what, there was always some mechanical or electrical problem with the thing.

I had decided the best thing to do was sell the truck and get something more reliable and less beat-up looking that could tow.  This meant compromising and getting a SUV (I hate SUVs).  My wife – who is an absolute saint – gave me the green light to get a Toyota FJ.  It meant that my DD wouldn’t get great gas mileage, but it would look pretty cool (IMHO) and be able to tow.

But then I ran into Joe and Bo.  They are actually neighbors that I bumped into while flying RC planes in a field near the house.  Bo is a veteran autobody mechanic and Joe is a hot rodder – they are both incredibly well versed in all things automobile.  Also they are both supremely fantastic human beings and I’m proud to consider them both friends.  I had them look the truck over and it appears that I’ve been doing a lot of panicking for now reason.  Bo quoted me an AMAZING price to do the body work and paint, and Joe and Bo are helping me get everything sorted mechanically.  Just working on it for one evening the thing is running better than it ever has.

The upshot of this is that I will NOT have to buy an SUV.  Getting everything I want done to the truck will cost less than the down payment on a new vehicle (far less) and according to the experts, I will have an extremely mechanically sound and sharp looking ride.  It is funny to me that I had put the restoration on hold for financial reasons and that in the end is allowing me to save a huge amount of cash.

My beautiful wife let me know that the whole time I was considering buying the FJ she was secretly throwing up in her mouth a little because she hates FJs.  The truck (when painted) she has agreed will be a much better fit in the driveway.  She gave me the go ahead to get the parts and whatnot and get moving.  Bo has already gotten new doors for me and painted them so this is for real happening.

I’ll try to do some more posts here in the next little bit that go over the new updates on the gauges, interior work and the new parts I’ve gotten!


Categories: Project Log Tags:

Lessons on Battery Cables and the Benefits of Diligent Research

February 4th, 2011 Comments off

Well it HAS been a while hasn’t it?  A lot has changed!  I finally found an excellent trustworthy mechanic.  As a result, some major problems have been fixed: primarily, the oil pan has been replaced with a proper gasket and no longer leaks, and the steering box has been replaced.  Also, he tuned it up.  And holy crap.  It is a different truck entirely now – it runs GREAT.  He also gave me the good news that my engine is (and these are his words here) “really a hot rod”.  I had always HOPED as much, but never knew for sure since I have little to compare it to.  And since the new steering box makes the thing actually drivable, I’ve really had a lot of fun.

When I first got it back a few days ago I immediately addressed some concerns.  First, the mechanic spotted a hole in my power steering reservoir so I went ahead and replaced that.  It was the least I could do seeing as how I put that hole there myself with a crowbar.  My bad.  I also replaced the starter as the old oil leak had really ruined it.  By the way: if you ever want to melt the terminal clamps on your battery cables and see your battery boil over,  just be careless and forget to re-route that starter cable properly.  That was an exciting time.

After some new cables and connectors, everything was running again (oddly, that boiled-over battery seems to be hanging in there).  I also took the chance to chase down the battery drain that has killed so many batteries of mine in the past.  It was the aftermarket tach, as it turns out.  So I will have to snag a new one and perform some dash cluster surgery.  I also replaced the fuel filter (man, I GOTTA replace that fuel tank).

I drove it to work today and it did great on the way there – but when I drove it at lunch time it suddenly developed a really loud knock-ish sort of sound.  I am 99% sure it is an exhaust leak brought on by either the freaking exhaust manifold gasket again, or more likely, I have disintegrated yet another set of manifold-to-exhaust donut thingies.  not sure why they keep burning up, but they do.  I’ll have to do some research.

Excellent segue.  Research is good.  While I was under there looking at my exhaust I notice a little drop of oil.  No where NEAR as much oil as I used to see under there – but definitely “freshly leaked” oil.  Now, before I could never tell where the oil was coming from because, well, everything leaked.  But now that the pan no longer leaks, and I replaced the valve cover gaskets a while back and they no longer leak.  So where is this oil coming from?  And it oil mind you – not ATF.  Not that it doesn’t leak ATF (it does) but this is way up front and also oil-colored.  After snooping around I notice that the seal around the fuel pump is soaked with oil.  Rats!  I was the one who replaced that.  But upon closer inspection I realized that there are two bolt holes right next to the fuel pump.  The bottom one appeared to have a lot of oil around it.  Then my little brain began to churn because AGES ago when I was researching engine numbers I remembered reading about a bolt hole down there that leaks during high RPMs.  And sure enough.  THERE IS SUPPOSED TO BE A BOLT IN IT!

I’m still going to replace the fuel pump gasket just for due diligence, but I will also be plugging that hole.  When I die, two things will be said about me: 1) “He wasn’t all that smart” and 2) “That engine never leaked oil again”.

Oh!  Also I installed a rear-view mirror.  Those things are really handy!  They should come standard.  Next on the list are new windshield, gas tank, transmission leak and doors.  Not necessarily in that order.

Categories: Project Log Tags:

Let There Be Headlights!

May 24th, 2010 Comments off

Believe it or not, I got my wife to ride in the truck last night!  I lured her with ice cream – but still.  Now that the truck is running (reasonably) well, I’m wanting to take it out more often so an ice cream run seemed like a good start.  After we had finished our Marble Slab goodness, we headed home.  It was probably 15 minutes or so after sunset, so as the heavens went out, I flipped the headlights on.  Now, they have always been a bit dim.  And they had a bad habit of flickering every once in a while that I had chalked up to a loose connection.  Recently I took the connectors apart, cleaned them up, and slapped some bulb grease on them in an attempt to rectify that.  But it turns out I was mistaken – that was not the problem.  Or at least it wasn’t the WHOLE problem, because after the headlights had been on for ten minutes or so, they started flickering again.  And not just a little flicker.  Imagine a signal lamp operator with turrets and you’ll get the idea.

I discovered after some (frantic) experimentation that if I turned the lights out for a minute or so, I could get a few minutes of non-blinking headlight.  But we were ten minutes or so from home – and I’m pretty sure the people around us thought I was trying to tell them to pull over.  So I pulled over and did a bit more experimentation.  I discovered that if I unplugged one of the lights, the other would operate flicker-free.  so we went the rest of the way home as a popeye.

Some research led me to believe that the problem lay in the wiring.  A common upgrade for old C/K trucks is a “Headlight Relay Upgrade”.  The OEM system routes power from the battery, through the fuse box, through the headlight switch in the dash, through many feet of wire, to the driver side light, through several more feet of wire and finally to the passenger side light.  That is a lot of room for resistance.  This resistance can eventually cause the switch to overload, hence the blinking.  It also results in dimmer lights, as they aren’t getting the voltage they really need.  The solution is to take the lights out of the circuit and instead have the power from the switches activate two relays (one for low beams and one for high).  then you can run higher gauge wire directly from the electrical system, through the relays and into the lights.  Much less resistance.  If you Google it you’ll get a ton of pages on it, but my favorite, and the one I used is here. Really helpful info.  I ended up using  Optronics A715 relays – less than four bucks a pop at O’Reilly’s.  I used 10 gauge wire for most of it which was overkill and a bitch to solder, but it was what I had on hand.  At least in the future if I want to add HIDs or something I won’t have to run new wire.

It took about four hours or so, but the result is working headlights.  They do seem brighter too, so bonus.  Another problem taken care of!

The big problems left now are:

  1. Paying someone to replace the oil pan and gasket
  2. Replacing the transmission pan and gasket
  3. Getting the carb adjusted or rebuilt
  4. Replacing the rust tank and lines
  5. Rebuilding the rearend
Categories: Uncategorized Tags:

Engine Work

May 22nd, 2010 Comments off

Lots of fun stuff recently.  I’ll admit – I’ve lost steam a little bit.  Having the bad experience with the rockers and then the bad luck with my Ion really took the wind out of my sails.  And the money out of my wallet.  I figure I have now flushed almost $2500 on those two problems now, only to end up right back where I started.  Cheeses me off a bit.

But that makes progress feel all the better!  I was telling my buddy Greg about all the leaks and whatnot and how the truck wasn’t running as well and he offered to lend a hand.  He has rebuilt several American engines, and is easily one of the most intelligent people I’ve ever met.  Plus he has a kickass Z.

The major symptoms were:

  1. It ran like crap
  2. Coolant was dripping from the bottom of the timing chain cover
  3. It was overheating
  4. It leaks oil and transmission fluid.  A lot.

The oil and tranny fluid would have to wait, but he was pretty sure the coolant was actually from the water pump.  This scared me because getting to the water pump meant taking out the radiator, fan, belts, and various other intimidating looking bits.  But hey – learning experience right?  So I began to prepare.  Greg said he could come over some weekend day and we could get it knocked out.  I decided to get as much of it done as possible before he came over so I had time to paint the bits I was taking off, and to get a good look at everything.

I decided that if I was going to take the radiator out, I might as well put the right size back in (not that I don’t love the “ziptied radiator” look).  So I bought a new radiator in addition to the new water pump and gaskets.  I then started to remove all the components.  I kept a really detailed list of everything I removed, and the order in which I removed it.  For each step I took a baggie and put any small hardware from that step in the baggy and labeled it with a sharpie, making sure to separate unlike sizes and lengths.  I also took the time to strip and repaint the alternator brackets, part of the tranny lines, air cleaner housing, fan and fan clutch and radiator mount.  I also snagged a new battery tray because the old one was pretty much nonexistent.

I also decided that it would be a good time to replace the thermostat housing which has leaked ever since I changed the thermostat last, and also to check the plugs.  Why check the plugs you ask?  Because when I last put in plugs, I didn’t gap them.  Yes, really.  I realized too late that I didn’t have a gauge.  So instead of jaunting down to the parts store I decided “What the heck.” and just didn’t gap them at all.  So yeah – mystery on why it was running poorly was solved.  So I pulled the plugs and gapped them.  I redid the thermostat housing as well and SOMEHOW (I still don’t understand how) I put the thermostat in upside down.  I was very surprised when I took that housing off.  So overheating problem solved!  I used a thin layer of Permatex 2 for the thermostat housing.  The new housing required slightly different length bolts than the old housing, so that meant another trip to the parts store.  It also had a brass plug in a threaded hole where a temp sensor can go (I guess).  I found out much later that you need to REMOVE that plug and seal the threads before you put it in.  Yeah, that was fun.

Anyway, on Saturday Greg came over and we got to work.  We hit some fun snags, like the fact that the PO had decided to use only 3 of the 4 required water pump bolts (wonder why it leaked?)  But eventually we had all the right hardware, and we put a thin layer of Permatex Thermostat Housing and Water Pump sealant on the block, and to one side of the gaskets.  Then stuck the clean side of the gaskets to the sealant on the block, and put on the pump.  I can vouch for that sealant – really impressive stuff.  No leaks!

Put everything back together and filled up the new radiator – runs like a champ now!  Well, ok , it did after a new fuel filter (darn rust!).

Altogether, a freaking great Saturday.

Categories: Uncategorized Tags:

The Clunky ION Is Repaired

March 31st, 2010 Comments off

So yeah.  Took the clunky ION back to the shop since I was now sure after my tests and research that it was the lower control arm bushings.  They are morons, and even after I told them what was wrong they still thought it was something else.  They allowed me to go back to the lift where I showed them with a screwdriver the same thing I did in my earlier video.  They said “Oh we hadn’t made it back that far.”

It’s 12 inches away.  In fact, they would have HAD to have removed the ball joint to replace the strut and it is attached to the stinking control arm.

But don’t worry!  They offered to fix it for free.  Oh no wait! – that would have made SENSE!  No, in reality they wanted me to pay an ADDITIONAL  $300 to fix the bushings.  And they would be replacing them with OEM.  So I said I’d think about it, which really means “I’ll be egging your house later, thanks.”

I ordered the Prothane bushings carried by Never Enough auto – and they are the BOMB and you should totally get some if you have an ION and have this problem.  The instructions are pretty good, though they gloss over some bits I wish they had elaborated on.  essentially the process is to remove the control arm, remove the old bushing (or in my case “Let the old bushing which is no longer attached in any way shape or form to the control arm fall merrily to the floor”), cut out the old sleeve, clean everything, grease up the new bushing, and press it in.

So the parts I thought would be really  hard weren’t.  But some parts I had not even given any thought to were about like trying to do rectal surgery on one’s self.  I just removed the bolts from the control arm to the subframe, the big bolt through the lower bushing, and the ball joint pinch bolt and the whole arm came out pretty easily.  Basically the old lower control arm bushing just fell out.  So I didn’t have to press that out.  And I also didn’t end up doing the front bushings because they didn’t really need it, and also I couldn’t understand how to get the mounting bracket out of the old bushing.  Pressing the new ones in was somewhat fiddly – especially with no actual press (if you are going to do this – pay the money for an actual tool or at least the $50 for a harbor freight arbor press.  )  Also, you really HAVE to install them from the top side of the arm or they will just never go in, because the top side is nice and beveled an the bottom side is sharp.  But it wasn’t really difficult.  No, the hard part was yet to come…

The fun began when I tried to get the arm back in. The clearance for the metal sleeve within the lower control arm bushing is exactly the same width as the opening into which you slide the lower control arm section.  So there is no room for error.  and that would be no problem at all – if you could slide it in directly from the side or end.  but you can’t.  Because the balljoint end of the control arm is hitting the wheel mount.  And short of REMOVING the wheel mount, there isn’t a whole lot you can do about it.  But I wasn’t about to do that, so I went with the “Yam It In” method.  It is a GM certified technique.  It didn’t work.  All it did was cut into the lower side of the bushing.  I finally ended up having to wedge the top portion of the bushing in, and the use the floor jack to apply pressure to the bottom bit of the bushing that was sticking out to kind of compress things a little.  Then it slide on it, but it wasn’t easy.  (on the other side, I figured out you can bend a thin piece of sheetmetal on the top and bottom edges of the opening and grease them up to help it slide in without cutting into the bushing)

I thought my pain was over, but I was wrong.  The lower control arm bushing bolt had to be reinserted.  But the sleeve in the bushing was at an angle to the holes the bolt goes through, so it wouldn’t line up.  If I got in the bolt at the bottom, it just jutted out at an angle – it was nowhere near the top hole.  If I tried to torque things to line the TOP hole up, the bottom hole bit into the bolt threads and got stuck.  So I had to sit there with a screwdriver shifting things around for like an hour (really) before it would finally line up.  The other side was worse for some reason.

But, five hours after I started, it was done.  And now there is NO CLUNK!  So I’m happy.  Tomorrow I’m taking it into to a DIFFERENT shop to get the squeaky coils fixed.  I’ll have them do an alignment while I’m there.
Categories: Uncategorized Tags: